
There are many reasons stars can become bloated: poor seeing conditions, poor guiding, overexposure, or even cheap filters. In this post, I'm going to show you a method I've been using to tame my stars.
Plenty of star-controlling techniques are at our disposal these days. If you haven't checked out the EZ Processing Suite script for Pixinsight, I highly recommend it. The "EZ Star Reduction" script works amazingly well at shrinking stars with minimal artifacts or ringing. Adam Block's "Star De-emphasis" technique is another good one. And, of course, you can always start by applying some deconvolution on your image in the linear phase to tighten the stars up at the beginning of your workflow. But what if you have a problematic set of data? Can you rescue it?
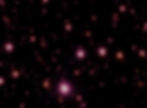
I'm going to take a *not-so-great* SHO data set I collected a few months ago on the Soul Nebula and show you how to tame the bloated stars. I acquired the data using my TS-Optics 94EDPH refractor with ZWO 7nm SHO filters and a ZWO ASI183MM Pro. In this case, I believe it was a combination of poor seeing on (at least) one of the nights in conjunction with the 7nm filters that caused my bloating issue. Here is the combined SHO image, auto-stretched:

And zoomed in:

Notice how soft they look. Stars like this are going to distract the viewer from the nebulosity - so I want to tame them to a point where they complement the overall composition.
For this method, the first thing we need to do is auto-stretch the image and separate the stars and nebula into separate images using the StarXTerminator process. Now you might be asking, "why perform a full auto-stretch before removing? Why not a light stretch so the stars aren't bloating so much?". Well, first of all, I've found that if you don't separate bloated stars with an auto-stretch applied, it can leave too many magenta/ringing artifacts in the nebula-only image. Thankfully, StarXterminator will separate most of the bloating with the stars, if properly stretched. Second, I like to have as many of the smaller stars as possible in my star-only image so that I can better control the final star image before re-combining with the nebula.
*Side note: something else I've recently found is that stretching the individual channels and removing their stars individually before combining the nebula-only images into SHO palette can also reduce nebula/ringing artifacts when separating stars.*
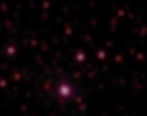
Here are my removed stars, in all of their noisy, magenta glory:

Zoomed:
I'm going to go ahead and apply a TGV denoise instance to this star image to smooth out the noise a bit. See my earlier blog post about this easy technique.
If you'd like to work the data along with this blog/video, here is a download link to the SHO star-only image with TGV Denoise applied.
This next part is important. I'm going to look at my three individual data sets and determine which set has the least-bloated stars:

I think the clear winner here is OIII. It also happens to be the noisiest channel, but in this case we're looking for the smallest, tightest stars. Be careful, though - if your OIII channel has some very bright stars, it may need to be disqualified. Bright stars often cause large halos for many OIII filters. In this case, there aren't any problematic bright stars, so I can use it. If there were, I would choose the H-alpha stars instead.
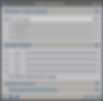
Let's take the stretched OIII data and separate the stars from it using StarXTerminator. I'll also apply TGV Denoise to this star image to smooth out any noise. Here's a download link of the resultant OIII star image (with TGV Denoise applied) if you're following the workflow, and here is a screenshot of the result:

Next, let's apply this OIII star-only image as a luminance to our SHO star-only image using the LRGB combination process. Here's what the process should look like:
Here's a crop of the result:
This is pretty ugly. But, the central star area is much smaller, tighter, and more defined thanks to the OIII star luminance we applied. Now we've got to get rid of the bloat/ringing.
To do that, we need to make a copy of the OIII star-only image and binarize it using the Binarize process. Create a preview and and adjust the binarize slider to the point where all (or most) of the stars appear. They will appear bright white because we are binarizing the data. Apply the process to the entire image when satisfied. Here's what my Binarize process looks like:

And the binarized image (crop):

Now, let's slightly convolute this binarized image so that the edges aren't so rough. Open the convolution process and use the preview to examine the edges. You only need to slightly smooth them out - this will define the edges of our stars in the final product, so keep that in mind when adjusting. Here are the settings I used:

Once happy, apply it to the entire binarized image. It should look like this (crop):

Next, apply this as a mask to the SHO star-only image, and invert the mask. I repeat, INVERT the mask!
With the SHO star image selected and masked, open the CurvesTransformation process and select the RGB/K curve. Anchor your highlights (0.75 X point coordinate) and midtones (0.50) with two points, and place a third point near the shadows (0.25). Then pull back on the shadows point until the bloat and ringing disappear. The binarized mask will protect the stars while allowing you to eliminate the bloat. Your Curves process should look similar to this:

And your preview should look like this:

A MUCH improved starfield. You can make adjustments to the shadows point until you are satisfied. I watch closely to make sure that the smaller stars aren't disappearing, but the bloat and ringing are mostly eliminated. The mask should do a great job of protecting even the small stars. If not, you may need to re-do your mask to include the smaller stars (go back to the binarize section). Apply the Curves process to the entire image once you are happy.
The final step is to determine if you want to keep the magenta color, or get rid of it. For this composition, I think I'll eliminate it. To do this, simply invert the entire image (make sure you remove the mask first!) and apply a green SCNR. Then invert it back. The magenta will be gone. For this image, the stars turn more of an orange-ish color when doing this (tight crop):

Finally, combine it with your fully-processed nebula image using Pixelmath. Here's my result:

And here's a GIF to show the difference between the original un-edited stars and the debloated stars:
It makes a huge difference in the overall feel of the image, in my opinion.
Theoretically, this method should work with OSC camera data as well. You'll need to split the RGB channels and see which of the channels has the smallest stars. If there's no major difference, simply proceed by creating a binarized star mask from a separated star image. The masked Curves effect will still work quite well.
I hope you find this useful - as usual, comments and feedback are welcome. Clear skies!
Chad